Supporter of Event Horizon

Wednesday, June 13, 2012

Event Horizon Games Discussions – How to play Game 6


Event Horizon Games Discussions – How to play Game 6

·         DEPLOYMENT: Pitch Battle (Rulebook P.93)
·         Primary: Modified Kill Points
·         Secondary: Table Quarters
·         Tertiary: VP

Final game of Event Horizon will be Modified KP (win by 2KP) and Table Quarters as secondary.

First thing to remember is that a KP game is not about how many KP you killed, it is about how many KP you can deny your opponent. Because taking KP requires you to roll dice (luck), while denying KP does not need any dice (strategy, movement) most of the time.

So what do you do?

  • Identify your weak KP (e.g. transport, open top vehicles, AV10, or small 5 men units) and find a way to protect them (e.g. hide, reserve, create a buffer with other units).
  • How to you intend to protect your weaker units once they arrive on the board? Will you hide them, or will you use your stronger units to keep the enemy away and make it hard to trade. If the enemy is willing to attack those units, make sure it will cost them in KP.
  • Identify opponent’s weak units and determine which of your unit is best to attack them (is it shooting, or will it be close combat?).
  • How do you intend to attack? What happens if they hide their units in reserve or behind cover? What will you do to get to them? Will you attack another target, which will likely be their harder targets?
Once you answered the above questions in the first five minutes, you should have a winning plan.


Tuesday, June 12, 2012

Event Horizon – Battle Report Game 5


Event Horizon – Battle Report Game 5

·         DEPLOYMENT: Spearhead (Rulebook P.93)
·         Primary: 2 Objectives – not in deployment quarter
·         Secondary: Table Quarters
·         Tertiary: VP

Instead of writing a general opinion on how to play Game 5, I have decided to put up a battle report. Within this article, I have included ‘Postgame review’ to highlight things I could have done better, hopefully people can learn from my mistakes and see how they can better play this mission.

The game is Grey Knight (Denis, I) vs. Space Wolf (David).

Army list

Grey Knight
Ordo Malleus Inquisitor (25), Terminator armour (40), Daemon hammer, Psycannon (15), Psychic Communion (30) – 110
Ordo Malleus Inquisitor (25), Terminator armour (40), Daemon hammer, Psycannon (15), 3 Servo skull (9) – 89

5 men Paladin Squad (275), 1 Master craft (5) Psycannon (20) & Halberd, 1 Master craft (5) Psycannon (20) & Daemon Hammer, 1 Storm bolter & Halberd, 1 Storm Bolter & Sword, 1 Storm Bolter & Hammer – 325

8 Psykers (80) – 80
Chimera (55), Multi laser, Heavy Flamer, Search light (1), Dozer blade (5) – 61

10 men Grey Knight Strike Squad (200), Justicar with Daemon hammer (10), 2 Psycannon (20) – 230
Rhino (40), Dozer blade (5), Search light (1) – 46

10 men Grey Knight Strike Squad (200), Justicar with Daemon hammer (10), 2 Psycannon (20) – 230
Rhino (40), Dozer blade (5), Search light (1) – 46

Grey Knight Terminator Squad (200), Justicar with Storm Bolter & Halberd, 1 Psycannon (25) & Daemon Hammer, 1 Storm Bolter & Sword, 1 Storm Bolter & Daemon Hammer, 1 Storm Bolter & Halberd – 225

Dreadnought (115), Twin link Autocannon (10), Twin link Autocannon (5), Psybolt ammo (5), Search light (1) – 136

Space Wolf
Logan Grimnar (275), The Great Wolf – 275

Rune Priest (100) with Chooser of the Slain (10), Bolter, Runic Weapon, Living Lightning and Murderous Hurricane – 110

Rune Priest (100) with Chooser of the Slain (10), Bolt Pistol, Runic Weapon, Living Lightning and Jaws of the World Wolf – 110

Lone Wolf (20), Terminator Armour (25), Storm Shield (25), Chainfist (15) – 85

7 x Wolf Guard (18) – 1 x terminator armour (15) with cyclone missile launcher (30), Storm bolter and Power Weapon, 1 x terminator armour (15) with Storm Bolter and Power fist (10), 5 x power armour with Bolt Pistol and Combi Melta (5) – 221
Drop Pod (35) – 35

6 x Wolf Guard (18) - 1 x terminator armour (15) with cyclone missile launcher (30), Storm bolter and Power Weapon, 1 x terminator armour (15) with Combi Plasma (5) and Power fist (10), 4 x power armour with storm bolter (3) and Combi Plasma (5) – 215
Drop Pod (35) – 35

10 x Grey Hunters (15) - 8 x Power Armour, Bolt Pistol and Close Combat Weapon, Bolter, 2 Plasmagun (10) – 160

10 x Grey Hunters (15) - 8 x Power Armour, Bolt Pistol and Close Combat Weapon, Bolter, 2 meltagun (10) – 155

5x Wolf Guard (18) - 1 x terminator armour (15) with cyclone missile launcher (30), Storm bolter and Power Weapon, 1 x terminator armour (15) with Storm Bolter and Power fist (10), 3 x Power Armour, Storm Bolter and Close Combat Weapon – 169

6 x Long Fangs (15) with 5 Rocket Launcher (10) – 140

6 x Long Fangs (15) with 5 Rocket Launcher (10) – 140

Deployment

I had won the die roll and elected to go first. I picked the bottom right table quarter and set up with an even formation with dreads in the centre, Paladins to the left and Strike squad on each end, with Terminators and an Inquisitor deep striking.

David responded by lining his 2 Grey Hunter squads as buffer, Logan, Lone Wolf and Rune Priests in the middle and Long Fangs on either end.

The objectives were located in the middle of the bottom left and top right quarters.
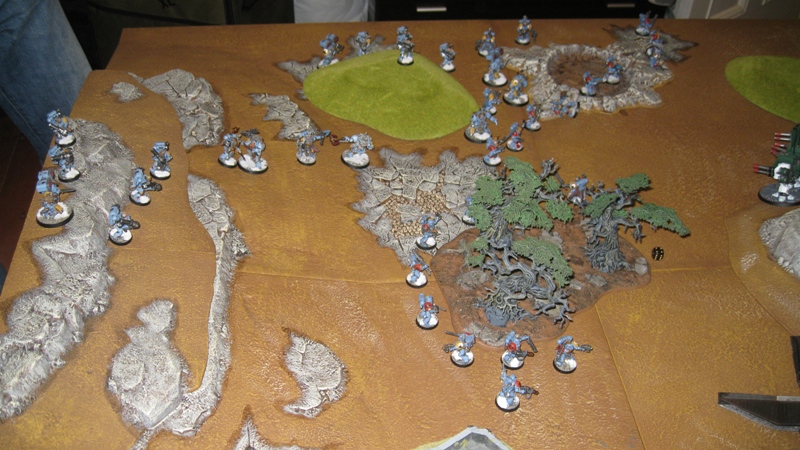
My set up


David's set up

Grey Hunter used as buffer to this other units

Postgame review: My deployment was simple and very ‘standard’, it did not challenge David and his reply (set up) was sufficient to put himself in a good position. It is important to post a challenging question to your opponent during setup. If your question is too simple (e.g. how I have set up), your opponent will easily counter your plan.

What I should have done was,
  • Picked the bottom left table quarter, deploy Inquisitor and psyker squad in the chimera, and 3 dreadnoughts behind the hill. The two Strike squads will also be behind the hill if it can all fit out of sight, otherwise, it will go into reserves.
  • Paladins, Terminators and the second inquisitor will arrive from reserve along my board edge.
This will delay engagement for a turn or two while it forces the SW to split if they want to advance to both objectives. When the Paladins and Terminators arrive, there will be 4 psycannons striking into any unit close to the bottom objective, while the top objective can be easily reached by the two Strike Squads in rhinos/chimera.

This will be a better question to pose to David and require more thought to formulate a proper response. The more you make your opponent think, the higher the chance you can win.

GK Turn 1

Move behind the central hill for cover

The three dreadnoughts move to the centre behind the hill with Paladins in chimera supported to the left and a squad of Strikes behind. Another Strike Squad moves towards the right and pop smoke to get ready and attack the flank next round. Psykers moves up ready to throw out S10 large blast.

Shooting phase was exceptional with the dreadnoughts killing the Lone Wolf and followed up with minor damage to the Long Fangs near the middle of the board.

Postgame review: I should have moved the chimera further left with the strike squad’s rhino position next to it to get myself into a better position. As you will see in David’s first turn, my poor positioning will cause me movement in turn 2 and 3.


SW Turn 1

 Drop Pod lands next to the Chimera to block movement of my army

David replied in kind and drop podded his melta squad to my left to cut off my movement. This was followed with his 10 men squad moving up on my left to provide support to his newly arrived melta squad. The other 10 men squad spread out to the right to move closer to the objective on the top right of the table.

In the shooting phase, his melta team was able to destroy my rear rhino, immobilise my Chimera with living lightning and immobilise my right rhino with his missiles.


GK Turn 2

Dreadnoughts rushes forward to pressure the Grey Hunters back

David moves towards the bottom objective

No reserve arrived.

With my mobility stemmed, I will need to work hard to get out of my poor position. The Strike Squad in the middle moves left and ready to charge the SW melta unit, this was supported by the Paladins moving out from their immobilised chimera. On the right the other Strike Squad abandon their immobilised rhino and move into the centre to support others.

Dreadnoughts move up in the middle under smoke cover to pressure the other Grey Hunter squad. With the Lone Wolf dead, only Logan is powerful enough to destroy these dreadnoughts in a short period of time. The move was follow with a run to close all three dreadnoughts into the Grey Hunters.

On the left, the Wolf Guard melta squad was charged by Paladins and Strikes. It was easy enough to dispose of them, but I pay the price with minimal movement.


SW Turn 2

Grey Hunter moves back and away from dreadnought


Grey Hunter moving to get behind the big hill (objective)

Grey Hunter also moving away from the Paladins
 
No reserve arrived.

David consolidated his position and moves his Grey Hunter squad towards the bottom left objective. The Grey Hunter squad to the right had to move back or risk being tied up by the dreadnoughts (supported by the strike squad).

In the shooting phase, he chooses to frag the strike squad on my left, reducing it to 7 men. While his other missiles only managed to stun one dreadnought in the middle. With his poor dice roll and my good luck, I was able to escape this round relatively unscathed.


GK Turn 3

One dreadnought moves towards the GH to reduce their movement

Everyone fired at the GH unit on the right

Only 1 GH and a Rune Priest survived
No reserve arrived.

Sensing this is the turn where I have to make an impact, I chose to attack his weaker side (my left). The strike squad on the right moved up onto the hill and close in to shoot, while the Paladins and Strike squad on the left move across towards the left objective.

One of the dreadnoughts moved forward towards the Grey hunter squad on the right to continue to pressure him and minimise his movement (he will need to charge the dreadnought and commit Logan next turn).

In the shooting phase, my 2 strike squads, 2 dreadnoughts and Paladins opened up onto the Grey Hunter squad on the left, reducing it to one man with a wounded Rune Priest. This should help me secure the left objective or forces David to commit more models to my left. With my goal achieved, I ended my turn 3.


SW Turn 3

Rune Priest retreat to the Long Fangs, GH hides next to the Long Fangs

No reserve arrived.

David has decided to forgo my left and drop back his Rune Priest to join the Long Fang squad. On the right, he finally commits Logan and the Grey Hunters by charging the approaching dreadnought.

In order to reduce my scoring units, he started to shoot krak missiles at my strike squads and managed to reduce the left squad to 3 men and the right hand squad to 6 men.

The initial charge into my dreadnought did no damage, but achieved its goal to slight Logan into the centre of the board, ready to attack the dreadnought next round.

GK Turn 4

All three dreadnoughts get in with Logan, Strike Squad moves back away and to their rhino

 Terminators drops in to support the bottom objective

Terminators and Inquisitor finally arrived.

With Logan committed to the right, and the rain of krak missiles to my strike squad on my left, I was forced to support my left with the terminators. The strike squad on the right retreated and ran towards their rhino to put some distance between themselves and Logan.

The two dreadnoughts charged in to support and hopefully tie up Logan and his squad for another two turns. Meanwhile, the paladins and the strike squad to the right moves into position to capture the left objective.
In the shooting phase, I was able to destroy his last Grey Hunter and damage the Long Fang squad located on the left hill.

In close combat, Logan and his squad was only able to destroy one dreadnought even though he had called on his Living Legend. 

SW Turn 4

Second drop pod arrive to kill my troops

Rune Priests joins in to attack my Terminators

Logan finishes the dreadnoughts and the explosion killed most of his squad

Second drop pod arrives with a Wolf Guard squad full of plasma guns.
To continue putting pressure on my left, David has decided to land his Wolf Guard squad full of plasma guns near my left objective and try to attack my Terminators. With cover save, I took three casualties but stay on to fight.

On the right, with the dreadnoughts tied up, his 5 men Wolf Guards made a dash for the objective on the right. But it looks like he will need a high run move in Turn 5 to reach the objective.
The shooting phase was quite successful with kark missiles on the Strike Squad to the right, reducing it to one model and causing it to flee 7” back towards me. This was problematic because they were needed to contest the right objective.

During close combat, I was not able to damage his marines while Logan and the Power fist Wolf Guard were able to rip a big hole in both the dreadnought. The resulting explosions kill all but 3 models (Logan, Wolf Guard in terminator armour and a Grey Hunter), more than I can ever do. Logan and his squad consolidated to the middle of the board.


GK Turn 5

Logan runs towards my objective

Paladins gets into Long Fangs and Wolf Guards

The Paladins continue to push forward and line up to engage both the plasma gun Wolf Guards and Long Fangs.

My terminator and Strike squad remain in place to hold the objective if the game ends this turn (for a draw or win). 

Shooting phase was minimal with the plasma squad taking one casualty. While my Paladins charged into both the Long Fang squad and the Wolf Guard squad containing his Rune Priest. I had managed to kill three of his Long Fangs and three Wolf Guards while losing one Paladin in return. Unfortunately, his Long Fangs decide to run while his Wolf Guards and Rune Priest stayed to fight.

SW Turn 5


David moved his 5 men Wolf Guard towards the right objective and run to close the distance, but it was slightly too far away. He will need to destroy my terminators and strike squad this round to ensure a draw.

Longan detached from his squad and ran towards my objective, to ensure a win if it went to turn 6, while his Long Fangs at the back start shooting krak missiles into my strike squad in order to thin them down. With the help of going to ground, I was able to save one model and hold on to the objective.

In close combat, I was able to kill this Rune Priest, Wolf Guard terminator and Wolf guard with the loss of another Paladin. I will now need to decide if I can support injured a healthy Logan next turn.
We rolled and the game continues to turn 6.

GK Turn 6


I turned on all my guns at Logan hoping to reduce two health points, but only managed one.
I decide not to go into close combat as it would be suicidal.

SW Turn 6


His Wolf guards moved onto the objective on the right without challenge.

Logan charged into my terminator squad, killing both terminators and the inquisitor and in return getting killed himself. While my last strike marine was shot down by a rain of krak missile. 

Since I had no scoring units left, we have decided to call the game and ended it at 1-0 objective.


Summary

Set up is the most important part of the game, because it will dictate your plan, and response. The more thinking/questions you can pose to your opponent, the more likely you will stump them.

Hopefully, this battle report helps you gain an idea on how to play Game 5 and what you can do with your own army.


Event Horizon Games Discussions – How to play Game 4


Event Horizon Games Discussions – How to play Game 4

·         DEPLOYMENT: Dawn of War (Rulebook P.93)
·         Primary: Table Quarters
·         Secondary: 5 Objectives
·         Tertiary: VP

Event Horizon Day 2 starts with Table Quarter and 5 objectives as the secondary. Table Quarter is earned by having the most VP in that quarter with Scoring Unit counting for full VP regardless of damage taken.
Similar to Game 3 on Day 1, this mission provides some advantageous to go second with the option to move into the needed quarters on turn 5, 6, or 7. This advantage is compounded with objectives as secondary mission also benefits from going second. 

If your army is mobile and/or fast, you can move around the outside and threaten two to three quarters in one movement phase. With a midfield armies and/or rock units, you can take the centre of the board and capture any quarter.

So, if you go first, Attack! Attack hard!

You will need to attack and aim to reduce your opponent’s mobility and force/divert/lure them deep in their own board edge for 5 turns. Put pressure from set up (half way) to force them back and then attack them to contain them deep. Pick their weaker side and disable one quarter of their army with your full force. Watch out for deep strike and out flankers as they are able to enter into your table quarters.
In this mission, you can be rewarded by being aggressive because it is Quarters and Objectives. It does not matter if 90% of my army is dead on turn 6, as long as your opponent is trapped within one quarter, or, you can capture hold 3 objectives even if you draw on quarters.


Monday, June 11, 2012

Event Horizon Games Discussions – How to play Game 3


Event Horizon Games Discussions – How to play Game 3


·         DEPLOYMENT: Spearhead (Rulebook P.93)
·         Primary: Table Quarters
·         Secondary: Modified Kill Points

Game 3 is Table Quarter and Modified KP (2 or more KP) as the secondary. Table Quarter is earned by having the most VP in that quarter with Scoring Unit counting for full VP regardless of damage taken.
It is advantageous to go second with the option to move into the needed quarters on turn 5, 6, or 7. This advantage becomes more obvious if your army is mobile (e.g. mech), fast, or have superior mid board presences. 

If your army is mobile and/or fast, you can move around the outside and threaten two to three quarters in one movement phase. Although this type of play would likely result in giving up central position at the start of the game.

If you have a midfield armies and/or rock units, you can take the centre of the board and capture any quarter. This will be the strongest play if your opponent has less staying power or they are more mobile.

So what do you do if you go first? You Attack!
Your aim will be to reduce your opponent’s mobility, and pressure them within their own quarter for 5 turns. Pressure from set up to force them back and then attack them to contain them deep within their quarter. Watch out for reserve units including deep strike and out flankers as they are able to enter into other quarters. 

If the attack seems suicidal, switch to KP mode and win on that front. Since you are starting first, you will have the first opportunity to deal damage.

Event Horizon Games Discussions – How to play Game 2


Event Horizon Games Discussions – How to play Game 2

·         DEPLOYMENT: Dawn of War (Rulebook P.93)
·         Primary: Modified Kill Points
·         Secondary: 3 Objectives
·         Tertiary: VP

Game 2 is Modified KP (2 or more KP) with 3 objectives set diagonally as the secondary.
On the face value, it seems advantageous to go first. You would have better position on board (set up to mid way) and gets to shoot first.

This is true if your army is special elite (Terminator Wing), strong staying power, low KP or slow. But unless you are IG, when you line across the half way line, you will spread yourself too thin and units become unsupported. You would also need to declare your hand first turn and come on board, likely followed by moving your front line back. This could open opportunities for your opponent to attack your weak spots and put you onto your back foot. This is made worst if they have search lights or acute senses where they get to have the first turn of firing even in night fight.
Going second will likely lose positional advantage, but you will be able to better react to your opponent. If you have longer range, superior long range firepower, speed or even superior close combat, you can chose to go second.

The major mistake I see players made in a KP game is not knowing when to defend. Even when they are at a KP advantage, they would press on determine to decimate their opponent. This gives the opponent a chance to come back into the game or win the game. 

To win a KP game is not about how many KP you take, it is about how many KP you can deny your opponent. Because taking KP requires you to roll dice (luck), while denying KP does not need any dice (strategy, movement) most of the time.

Event Horizon Games Discussions – How to play Game 1


Event Horizon Games Discussions – How to play Game 1

 
·         DEPLOYMENT: Pitch Battle (Rulebook P.93)
·         Primary: 5 Objectives
·         Secondary: Modified Kill Points (win by 2KP)
·         Tertiary: VP

Game 1 is a traditional tier mission of 5 objectives and KP secondary. 

Going first or second will be largely depends on the make up of your army. While going second would be preferable for an objective mission, an army with weak staying power (e.g. IG) might find it difficult to shift tougher opponents off an objective. An army with superior firepower might also want to go first to decimate their opponent early.

In general,
  • if you are going first, you should force your opponent into an unfavourable position via firepower or threat of close combat through aggressive movement
  • if you are going second, you should look to minimise first turn damage and break out of your deployment zone, getting yourself into position from turn 4 to threaten as many objective as necessary to win the game
  • if you have a faster army, you should look to draw your opponent to a useless position on the board (e.g. away from objective)
  • if your army is slower, you should remain tight and compact, spreading out for objectives as late as possible
  • Always play for the primary mission, but always destroy whole units, preferably scoring units. This ensures focus while covering the secondary
  • Position is everything. It does not matter if you kill 99.9% of his army when you are not in the right position to claim objectives – and he is.


Wednesday, May 30, 2012

Event Horizon – Missions 2012


In Event Horizon 2011, we used four basic mission types – 5 Objectives, Modified Kill Points (win by 3 or more), Table Quarters, and Victory Points – in a tier system to determine the winner.

Following feedback from players, I have taken a slight twist to the system in 2012 to create more variety between games while maintaining consistency across the playing field. We still have Objectives, Modified Kill Points, Table Quarters, and Victory Points, with the following changes,

  • It is no longer 5 objectives for objective games.
    Objectives are still fixed to maintain consistency across the playing field but there are games with 2 objectives, 3 objectives, and 5 objectives, to create different game play and strategy. 


  • Modified KP has the margin reduced to win by 2KP or more.
    After 18 months of play testing, we have concluded that it was too easy to defend/draw a 3KP margin game. Using ‘win by 2KP’ margin will mitigate some lucky dice results while encouraging players to attack and defend in the KP mission.

  • Tiers have been reduced to Primary and Secondary with VP as final decider.
    This create a bigger focus on the primary mission, while still giving players with bad match-up an alternative to victory via drawing the primary and winning the secondary mission.

  • As a result of the change in tier system, there will be games without one of the three key missions. Objectives, KP, or Quarters will not appear as a tier mission in two of the six games.
    This change should reduce the chance of ‘gaming’ the tier system and put more emphasis in playing the missions. Players can no longer rely on one key mission to carry them through the tournament.
Our aim is to bring freshness and variety in the game while maintaining the competitiveness of Event Horizon.


1.   Games

Mission special rules for all games includes,
·         Seize the initiative (Rulebook P.92)
·         Infiltrate, Reserves, Deep strike, Outflank/Scout (Rulebook P.94)

1.1. Games 1


·         DEPLOYMENT: Pitch Battle (Rulebook P.93)
·         Primary: 5 Objectives
Big Win [20] – control 3 more Objectives than your opponent (e.g. 3-0, 4-1, 5-0)
Win [15] – control more Objectives than your opponent
Draw [10] – control the same number of Objectives as your opponent
Lose [5] – control fewer objectives than your opponent
Major Defeat [0] – control 3 less Objectives than your opponent (e.g. 0-3, 1-4, 0-5)
·         Secondary: Modified Kill Points
Win [10] – Win by 2 KP or more than your opponent (e.g. 2-0, 3-1, 4-2)
Draw [5] – Within 1 KP as your opponent (e.g. 0-1, 2-1, 1-2)
Lose [0] – Lose by 2 KP or more than your opponent (e.g. 0-2, 1-3, 2-4)
·         Tertiary: VP


1.2. Games 2


·         DEPLOYMENT: Dawn of War (Rulebook P.93)
·         Primary: Modified Kill Points
Big Win [20] – Win by 5 KP or more than your opponent (e.g. 5-0, 6-1)
Win [15] – Win by 2 KP or more than your opponent (e.g. 2-0, 3-1, 4-2)
Draw [10] – Within 1 KP as your opponent (e.g. 0-1, 2-1, 1-2)
Lose [5] – Lose by 2 KP or more than your opponent (e.g. 0-2, 1-3, 2-4)
Major Defeat [0] – Lose by 5 KP or more than your opponent (e.g. 0-5, 1-6)
·         Secondary: 3 Objectives
Win [10] – control more Objectives than your opponent
Draw [5] – control the same number of Objectives as your opponent
Lose [0] – control fewer objectives than your opponent
·         Tertiary: VP


1.3. Games 3


·         DEPLOYMENT: Spearhead (Rulebook P.93)
·         Primary: Table Quarters
Big Win [20] – control 2 more Quarters than your opponent (e.g. 2-0, 3-1, 4-0)
Win [15] – control more Quarters than your opponent
Draw [10] – control the same number of Quarters as your opponent
Lose [5] – control fewer Quarters than your opponent
Major Defeat [0] – control 3 less Quarters than your opponent (e.g. 0-2, 1-3, 0-4)
·         Secondary: Modified Kill Points
Win [10] – Win by 2 KP or more than your opponent (e.g. 2-0, 3-1, 4-2)
Draw [5] – Within 1 KP as your opponent (e.g. 0-1, 2-1, 1-2)
Lose [0] – Lose by 2 KP or more than your opponent (e.g. 0-2, 1-3, 2-4)
·         Tertiary: VP


1.4. Games 4 


·         DEPLOYMENT: Dawn of War (Rulebook P.93)
·         Primary: Table Quarters
Big Win [20] – control 2 more Quarters than your opponent (e.g. 2-0, 3-1, 4-0)
Win [15] – control more Quarters than your opponent
Draw [10] – control the same number of Quarters as your opponent
Lose [5] – control fewer Quarters than your opponent
Major Defeat [0] – control 3 less Quarters than your opponent (e.g. 0-2, 1-3, 0-4)
·         Secondary: 5 Objectives
Win [10] – control more Objectives than your opponent
Draw [5] – control the same number of Objectives as your opponent
Lose [0] – control fewer objectives than your opponent
·         Tertiary: VP


1.5. Games 5


·         DEPLOYMENT: Spearhead (Rulebook P.93)
·         Primary: 2 Objectives – not in deployment quarter
Big Win [20] – control 2 Objectives
Win [15] – control more Objectives than your opponent
Draw [10] – control the same number of Objectives as your opponent
Lose [5] – control fewer objectives than your opponent
Major Defeat [0] – control 2 less Objectives than your opponent (0-2)
·         Secondary: Table Quarters
Win [10] – control more Quarters than your opponent
Draw [5] – control the same number of Quarters as your opponent
Lose [0] – control fewer Quarters than your opponent
·         Tertiary: VP


1.6. Games 6


·         DEPLOYMENT: Pitch Battle (Rulebook P.93)
·         Primary: Modified Kill Points
Big Win [20] – Win by 5 KP or more than your opponent (e.g. 5-0, 6-1)
Win [15] – Win by 2 KP or more than your opponent (e.g. 2-0, 3-1, 4-2)
Draw [10] – Within 1 KP as your opponent (e.g. 0-1, 2-1, 1-2)
Lose [5] – Lose by 2 KP or more than your opponent (e.g. 0-2, 1-3, 2-4)
Major Defeat [0] – Lose by 5 KP or more than your opponent (e.g. 0-5, 1-6)
·         Secondary: Table Quarters
Win [10] – control more Quarters than your opponent
Draw [5] – control the same number of Quarters as your opponent
Lose [0] – control fewer Quarters than your opponent
·         Tertiary: VP